
A dull kitchen knife can turn a simple cooking task into a frustrating chore. Slicing tomatoes becomes messy, chopping onions takes longer, and cutting vegetables feels like hard work. The good news? You don’t always need an expensive sharpening machine or a trip to a professional to restore your knife’s edge. With the right tools and a little care, you can sharpen an old knife at home in just a few minutes.
Whether you’re preparing dinner or giving your favorite kitchen knife some much-needed attention, these practical methods can help you get better results without making the process complicated.
Why Your Kitchen Knife Gets Dull
Even a good-quality knife loses its sharpness with regular use. Every time the blade comes into contact with a cutting board, food, or other surfaces, its fine edge gradually wears down or becomes misaligned.
Using glass or stone cutting boards, storing knives loosely in a drawer, and cutting on hard surfaces can speed up the process. Sometimes, a knife feels dull simply because its edge has rolled slightly to one side rather than worn away completely.
Understanding the difference matters because a honing rod can realign a slightly misaligned edge, while a sharpening stone or similar abrasive tool removes a tiny amount of metal to create a new edge.
1. Use a Knife Sharpening Stone for the Best Results
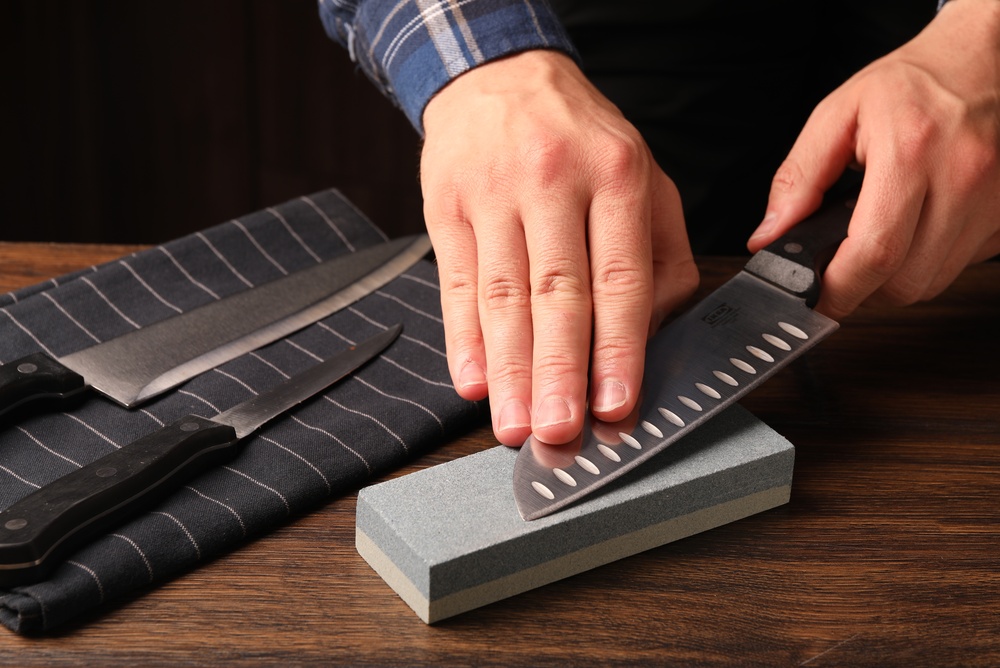
A whetstone, also called a sharpening stone, is one of the most reliable ways to restore a dull kitchen knife. It takes a little practice, but you can achieve excellent results at home.
What you’ll need
- A suitable knife sharpening stone
- Water, if your stone is designed for water use
- A damp towel to keep the stone from slipping
How to do it
- Read the stone manufacturer’s instructions. Some stones need soaking, while others only require a little water or must be used dry.
- Place the stone on a stable, nonslip surface.
- Hold the knife at the angle recommended for its blade, commonly around 15–20 degrees per side for many Western kitchen knives.
- Move the blade across the stone in controlled strokes, working along the entire cutting edge.
- Repeat on the other side, keeping your angle consistent.
- Rinse and dry the knife carefully, following the stone’s instructions for cleanup.
The exact time depends on how dull the knife is and the type of stone you’re using. A slightly dull blade may improve within a few minutes, while a badly worn edge can take longer.
Helpful tip: If you’re new to sharpening, practice on an inexpensive kitchen knife first. Consistent technique matters more than applying extra pressure.
2. Try a Honing Rod for a Quick Edge Adjustment
If your knife has become slightly less effective but isn’t severely dull, a honing rod may be all you need. Honing helps realign the cutting edge and is useful for routine knife maintenance.
Here’s how to use one
- Place the tip of the honing rod firmly on a nonslip cutting board or another stable surface.
- Hold the knife at the appropriate angle for its blade.
- Draw the blade down the rod in a controlled motion, moving from the heel toward the tip.
- Repeat on the opposite side with light, even pressure.
- Make a few alternating passes rather than repeatedly dragging the blade against the rod.
A honing rod is not a substitute for sharpening when the blade has genuinely lost its edge. Traditional steel honing rods mainly realign an edge, while ceramic and diamond-coated rods can also remove some material.
Safety reminder: Keep your fingers away from the blade’s path, and avoid fast, dramatic sweeping movements. Slow and controlled strokes are much safer.
3. Use a Pull-Through Sharpener for Convenience
If you want a straightforward option with minimal technique, a manual pull-through sharpener can be a convenient choice. Many models have a designated sharpening slot and a guide that helps maintain the blade angle.
Follow these steps
- Place the sharpener on a flat, stable surface.
- Check the instructions to determine which slot to use and whether your knife is compatible.
- Insert the blade into the designated slot.
- Pull the knife through in the direction specified by the manufacturer, using light, steady pressure.
- Repeat only as directed, then clean and dry the knife.
This method is quick and beginner-friendly, but not every sharpener is suitable for every knife. Some can remove more metal than necessary, and certain designs may damage delicate or specialized blades.
Choose a model appropriate for your knife, especially if you own Japanese knives, serrated blades, or expensive specialty cutlery.
4. Use a Ceramic Sharpening Rod for Light Maintenance
A ceramic rod can help maintain a kitchen knife’s edge between more thorough sharpening sessions. Unlike a traditional steel honing rod, ceramic is abrasive and can remove a small amount of metal as it works.
Use the rod according to its instructions, keeping the blade at a consistent angle and applying gentle pressure. Clean the blade afterward to remove any residue.
This is a useful option when a knife needs a little attention but doesn’t require extensive repair. However, a badly chipped or severely worn blade may need a sharpening stone or professional service instead.
Can You Sharpen a Knife With a Coffee Mug?
You may have seen the trick of turning a ceramic coffee mug upside down and running a knife along its unglazed bottom rim. Although this method appears in many home-sharpening tips, it isn’t the best choice for routine knife care.
The exposed ceramic can be abrasive, but its surface, angle, and consistency are difficult to control. You could scratch or damage the blade, create an uneven edge, or slip and injure yourself.
A proper sharpening stone or suitable knife sharpener is a safer, more predictable choice. If you have only a dull knife and a coffee mug, it’s better to wait until you can use the right equipment.
How to Tell Whether Your Knife Is Sharp Again
After sharpening, you should check the blade carefully before using it to prepare food.
A simple option is to slice a ripe tomato on a stable cutting board. A reasonably sharp knife should begin cutting through the skin with controlled pressure rather than crushing the tomato.
You can also test the knife on a piece of paper held securely away from your fingers, but only if you can do so safely. Never run your finger along the cutting edge to test its sharpness.
If the knife still struggles to cut, check whether it needs more sharpening or whether its edge has been damaged. Avoid forcing the blade through food to compensate for poor sharpness.
Common Knife-Sharpening Mistakes to Avoid
Getting a good edge isn’t just about choosing the right tool. Your technique and handling matter, too.
Pressing too hard: Excessive force can make the blade harder to control and may create an uneven edge. Let the sharpening surface do the work.
Changing the angle repeatedly: An inconsistent angle can produce a rounded or uneven edge. Follow the blade’s recommended sharpening angle.
Sharpening every time the knife feels slightly dull: Sometimes honing is enough to restore cutting performance. Sharpening removes metal, so doing it unnecessarily can shorten the blade’s useful life.
Using the wrong sharpener: Serrated knives, ceramic knives, and certain specialty blades need specific care. Check the manufacturer’s guidance before using a generic sharpener.
Ignoring safety: A sharp knife can cause serious injuries if it slips. Secure your sharpening equipment, keep your hands out of the blade’s path, and work slowly.
How to Keep Your Knife Sharp for Longer
Once you’ve restored your knife’s edge, a few simple habits can help it stay sharp for longer.
- Use wooden or plastic cutting boards rather than glass, marble, or other hard surfaces.
- Wash your knife by hand and dry it promptly, unless the manufacturer specifically advises otherwise.
- Store knives in a knife block, protective sheath, or suitable magnetic holder.
- Avoid tossing knives loosely into a kitchen drawer.
- Use a honing rod when appropriate to maintain the edge between sharpening sessions.
- Never use a kitchen knife to open cans, cut packaging with staples, or pry objects apart.
Regular care can reduce how often you need to sharpen your knives and help them remain dependable for everyday cooking.
The Easiest Way to Sharpen an Old Knife at Home
If you want the best balance of speed, safety, and results, start by checking how dull your knife really is. A slightly misaligned edge may benefit from a honing rod, while a genuinely dull blade will usually need a sharpening stone or a suitable sharpener.
For beginners, a quality pull-through sharpener can offer a simple starting point, provided it’s compatible with your knife. If you’re comfortable learning a technique, a sharpening stone gives you more control over the process.
Remember, the goal isn’t to finish as quickly as possible. It’s to restore a clean, even edge without damaging the blade or putting your fingers at risk. With the right tool and a few careful minutes, you can make your old kitchen knife much more useful again.